毫无疑问TensorFlow从诞生之初便是各种贵族血统,光环加身。相比于目前比较流行的一些deep learning 框架,比如Theano, Caffe2,或者是百度的PaddlePaddle,虽然TensorFlow起步比较晚,但竟后来居上获得了大多数人的青睐,不管是学术研究还是产业界。究其原因,当然每个人都能说上几点。但写TensorFlow for Machine Intelligence的哥么总结的很到位,简单的说就是TensorFlow旨在解决目前深度学习框架在学术研究的易用性和产业界的实用性不能兼得的困境。
"Unfortunately, most of these libraries have a large trade off between flexibility and production-worthiness. Flexible libraries are invaluable for researching novel model architectures, but are often either too slow or incapable of being used in production. On the other hand, fast, efficient, libraries which can be hosted on distributed hardware are available, but they often specialize in specific types of neural networks and aren’t suited to researching new and better models. This leaves decision makers with a dilemma: should we attempt to do research with inflexible libraries so that we don’t have to reimplement code, or should we use one library for research and a completely dif erent library for production? If we choose the former, we may be unable to test out dif erent types of neural network models; if we choose the latter, we have to maintain code that may have completely di erent APIs. Do we even have the resources for this?
TensorFlow aims to solve this dilemma."
好了,闲话不多扯。本篇主要介绍TensorFlow在MacOS上的的安装过程,以及配合Jupyter Notebook做些简单的入门操作。
安装配置
TensorFlow
官网提供了4种安装方法,没有优劣之分,只是针对不同用户不同场景进行选择。
- virtualenv. 和已有Python开发环境隔离的虚拟环境,不依赖当前工作环境的各种package版本,安装TensorFlow的所有依赖到独立的目录,需要时只要activate下就行
- "native" pip. 使用已有的Python环境,相关packages(比如numpy等),只安装必要的依赖,比方法1需要下载的packages一般要少。但如果原环境比较老旧或是跟TensorFlow依赖有不兼容等,安装过程较为折腾。
- Docker. 相对来说镜像比较大,可能有大几百M,但如果系统已经安装Docker或Docker重度用户,可以试试.
- installing from source. 最折腾,但有收获……
山人比较懒,直接采用第一种virtualenv安装。
安装virtualenv
sudo easy_install pip
sudo pip install --upgrade virtualenv
创建 virtualenv和相关的setup tools.
# for python 2.7
virtualenv --system-site-packages ~/tensorflow
# for python 3.n
virtualenv --system-site-packages -p python3 ~/tensorflow
根据不同的shell,激活virtualenv
# for bash, sh, ksh, or zsh
source ~/tensorflow/bin/activate

# csh or tcsh
source ~/tensorflow/bin/activate.csh

# for fish
source ~/tensorflow/bin/activate.fish
检查pip version, 如果小于8.1,执行下面一行
easy_install -U pip
用pip安装TensorFlow及其依赖的环境.
# for Python 2.7
pip install --upgrade
# for Python 3.n
pip3 install --upgrade tensorflow
OK, that's All.
# deactivate TensorFlow
deactivate
# remove TensorFlow and its dependencies
rm ~/tensorflow
检查是否安装成功
$ python
Python 2.7.10 (default, Feb  7 2017, 00:08:15)
[GCC 4.2.1 Compatible Apple LLVM 8.0.0 (clang-800.0.34)] on darwin
Type "help", "copyright", "credits" or "license" for more information.
>>>import tensorflow as tf
Jupyter Notebook
直接通过pip来安装Jupyter:
# for python3
python3 -m pip install --upgrade pip
python3 -m pip install jupyter

# for python2.7
python -m pip install --upgrade pip
python -m pip install jupyter
检查是否安装成功
直接runjupyter notebook,打开浏览器进入网址http://localhost:8888/tree
数据类型与基本操作
In general, TensorFlow提供了一整套的tool suites, 对机器学习领域一些基础的操作、领域模型、对象和建模学习过程进行了统一的抽象和封装。并且以图模型的方式来组合各个操作和数据流。山人的体会是,TensorFlow更像是一门语言,从基本的数据类型,如常量,变量;基本操作,如数学运算,向量,矩阵运算;当然还有其最为擅长的数值运算,求导数、梯度之类的。
且如果从编程语言的角度来看TensorFlow,它更像是一种函数式语言而非命令式的。因为每次我们用TensorFlow进行计算建模时,基本的过程总是类似的:首先声明基本的数据类型和operator节点(Tensor),定义一个graph;然后当真正需要计算时,开一个Session,把这个graph放到Session里执行,这过程中在喂给图模型实际的数据,最后计算出结果。
常量类型
tensor便是TensorFlow最基本的数据类型概念,其表示某种geometric对象,用来描述基本的标量(scalar), 向量(vectors),或是更高维度的(matrix等)之间的线性关系。因此我们一般语言中提及的数值常量,向量或是二维矩阵,或是更高纬的vectors,都是一种特殊的tensor。在TensorFlow中
# scalar(0d tensor)
tf.constant(2, name="scalar")
# vector(1d tensor)
tf.constant([2, 4], name="vector")
# matrix(2*2 tensor)
tf.constant([[0, 1], [2, 4]], name="matrix")
如早期Machine Learning课程上用的Scientific Programming Language Octave,TensorFlow 也支持创建很多具有特定值和形状的Tensor,
# tf.zeros(shape, dtype=tf.float32, name=None)
# 创建一个所有元素全部是0的2*4举证
tf.zeros([2, 4], tf.int32) ==> [[0, 0, 0, 0], [0, 0, 0, 0]]

# tf.zeros_like(input_tensor, dtype=None, name=None, optimizer=True)
# 创建一个跟input_tensor一样形状的Tensor,只是所有的元素都是0.
tf.zeros_like(input_tensor)

# 同理还有tf.ones, tf.ones_like

tf.ones([2, 4], tf.int32) ==> [[1, 1, 1, 1], [1, 1, 1, 1]]
tf.ones_like(input_tensor)

# 当然如果你问我们创建其他任意值得Tensor么?答案当时是肯定的。
# tf.fill(dims, value, name=None);
tf.fill([2, 4], 8) ==> [[8, 8, 8, 8], [8, 8, 8, 8]]
创建线性序列(Sequence)
# tf.linspace(start, stop, num, name=None);
# 创建一个有num个元素的序列,起始和结束点分别是start和stop,值得注意的是这里的start和stop的dtype类型不能为tf.int32, 而是tf.float32或tf.float64.
tf.linspace(0.0, 10.0, 5) => [  0.    2.5   5.    7.5  10. ]

# tf.range(start, limit=None, delta=1, dtype=None, name='range')
# 创建一个从start点开始,以步长delta增长的序列。最后一个点可以小于stop,但不包括stop。且相比于tf.linspace,start和stop可以是tf.int32也可是tf.float32等。
tf.range(0, 10, 5) => [ 0, 5];
有一点值得注意的时,虽然TensorFlow兼容几乎numpy所有的数据类型,TensorFlow的序列是不可迭代的。
for _ in np.linspace(0, 10, 4): # OK
for _ in tf.linspace(0, 10, 4): # TypeError: 'Tensor' object is not iterable.
随机抽样分布
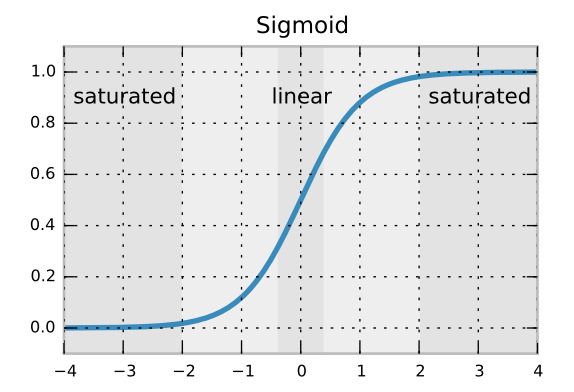
创建随机正态分布和truncated_normal正态分布。 truncated正态分布顾名思义就是针对一般按照均值和标准差进行抽样的正态分布样本进行一些删选,移除那些距离均值距离大于2倍标准差的点
从机器学习的角度,这样做的目的是为了防止神经元由于激活函数(如sigmoid,tanh)的过饱和而停止学习。
 。
。
%matplotlib inline

# random和truncated_normal正态分布。
n = 500000
A = tf.truncated_normal((n,))
B = tf.random_normal((n,))
with tf.Session() as sess:
    a, b = sess.run([A, B])

plt.subplot(3,2,1);
plt.hist(a, 100, (-4.2, 4.2));
plt.subplot(3,2,2);
plt.hist(b, 100, (-4.2, 4.2));

# random uniform distribution
rand_t = tf.random_uniform([5], 0, 10, dtype=tf.int32, seed=0)
with tf.Session() as sess:
    t = sess.run(rand_t);

plt.subplot(3, 2, 3);
plt.plot(t);
创建均匀分布和随机shuffle 针对Tensor 序列进行随机shuffle,使得尽可能降低模型对数据集不相关特征(如对称性、特定顺序)的假设,提高模型质量和预测准确性。
# 随机正态分布
rand_t = tf.random_uniform([5], 0, 10, dtype=tf.int32, seed=0)
with tf.Session() as sess:
    t = sess.run(rand_t);

plt.subplot(3, 2, 3);
plt.plot(t);

# random shuffle plot
f_sequence = tf.range(1, 10);
f_shuffle = tf.random_shuffle(f_sequence)
with tf.Session() as sess:
    f_s = sess.run(f_shuffle);

plt.subplot(3, 2, 4);
plt.plot(f_s);
Tensor(Matrix)随机Corp与多项式分布 随机Corp在图像识别类算法(RNN)预处理阶段尤为重要。
# random crop
# output will be ==> [[8 9], [1 2]]
c_crop_before = tf.constant(([[3, 4, 5], [7, 8, 9], [0, 1, 2]]), name="before-crop");
c_crop_after = tf.random_crop(c_crop_before, [2, 2], name="after-crop");
with tf.Session() as sess:
    c_crop_plot = sess.run(c_crop_after)
    print c_crop_plot

# multinomial
multi_samples = tf.log([[10., 10., 10.]]);
multi_before = tf.multinomial(multi_samples, 5)
with tf.Session() as sess:
    print sess.run(multi_samples)
    print sess.run(multi_before)
通过matplotlib直观感受下这几种随机抽样分布图,如下所示
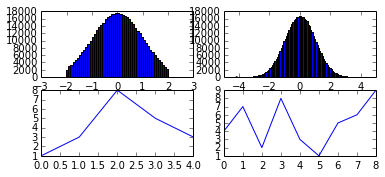
顺时针方向分别是
- 随机抽样。
- truncated随机抽样。
- 在0-10之间5个样本点的均匀分布。
- 1-10的顺序序列的随机shuffle。
篇幅所限,在下篇继续TensorFlow的Variables, TensorBoard, 控制依赖方法等。
So long, and thanks for all the fish.
参考
[1] Official Tensorflow Installation On Mac.
[2] Tensorflow for Deep Learning Research.
[3] stackoverflow